Thank you for stopping by.
April 18, 2024
Memory Box DT Post - Sensational Gladiola Stem
Hello everyone. I’m up on the Memory Box blog today sharing this simple floral card featuring the new Sensational Gladiola Stem die from the current 2024 Gladiola release. To join me over there, please click on the photo.
Challenges:
April 14, 2024
Stay Crafty April 2024 Challenge Reminder - Happy Anniversary
Hello everyone. I have a reminder card for the April Stay Crafty Happy Anniversary/Birthday challenge over on the Hero Arts (HA) blog.
I made another birthday card and guess who made her first light up card!?💡 That’s right… ME! 😂
Started by die cutting heavy weight white alcohol marker friendly cardstock using a rectangle infinity die. Stamped the cake slice on it with Memento Tuxedo Black ink then coloured in with Copic Sketch markers. Stamped the sentiments with red dye ink. Inked the bottom of the sentiment stamps in black and re-stamped. I wanted to tone down the bright red a bit.
Copic markers used:
browns - E31/23/25/27/29
reds - R32/35/39
yellows - Y000/11/13/15
shading - C00/1/2/3
The one light from Pear Blossom Press was the light up mechanism. A hole was punched out in the flame and the opening backed with vellum. Aligned the light to shine through the hole when the button is pressed and mounted the front panel on top with 2mm foam adhesives.
Used a white gel pen to add “confetti” (probably should have skipped this step 🤷🏻♀️) and adhered the “PRESS” strip (printed out with my label maker) over the button to finish. Here’s a short video.
To qualify for one of two HA $50 gift cards to their online shop, your project must include at least one HA brand product. One winner will be chosen randomly (so everyone has a chance) and the other will be voted on by the DT. To link up your entry by 5:00 pm PT on May 5,, 2024, please click HERE. Thank you for stopping by.
Challenges:
April 10, 2024
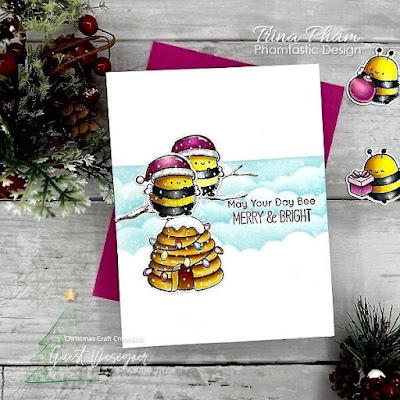
Guest Designer for Christmas Craft Creations April 2024 Challenge - Non-traditional Colours
Hello everyone. I’m excited to be guest designing (GD) at Christmas Craft Creations (CCC) this month for their April Non-Traditional Colours challenge.
*please note: affiliate links used in this post when possible at no extra cost to you… thank you!
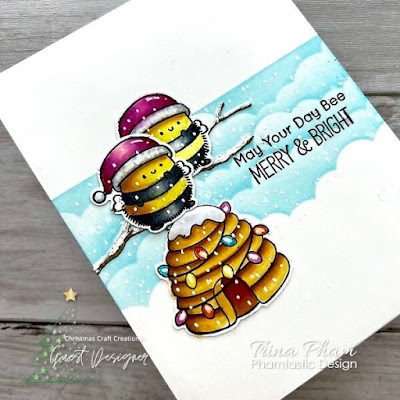
Non-traditional colours to me means not red/green or red/gold. I then remembered never before used (NBUS) Merry Bees-mas stamp and dies from My Favorite Things (MFT) and NBUS Bee Merry stamp from Clearly Besotted and inked them up for my card. Let me introduce you to twin bees, Merry and Bright. 😂*lol*
The images were stamped with Memento Tuxedo Black ink on X-Press It paper and coloured with Copic Sketch markers. The bees were die cut out with the matching die. There is no die available for the beehive, so it was fussy cut out.
Copic markers used:
yellows - Y11/13/15, V01
blacks - C3/5/7/9
pinks - RV10/63/55/09
beehive - Y21, YR21/23/24/27
lights - BG05, RV06, Y06, YR07
shading - C00/1/3
Next, masked the upper portion of an A2 size Bristol panel and ink blended Salvaged Patina distress ink over NBUS slimline cloud stencil (retired from MFT). Lightly splattired with water and dabbed with a paper towel. The Woodland Branch from Memory Box was die cut from brown cardstock. Stamped the sentiment in black directly onto the panel, then assembled the card. Added snow details with a white gel pen to finish.
I want to thank Charlotte and the CCC design team (DT) for this GD opportunity. For inspirations from the DT and to link up your entry, please click HERE. Thank you for stopping by.
Challenges:
NBUS #61 - new stamps/dies/stencil
April 05, 2024
Stay Crafty with A Blog Named Hero April 2024 Challenge - Happy Anniversary
Hello everyone. It’s time for the April Stay Crafty with A Blog Named Hero challenge over on the Hero Arts (HA) blog. Being that it’s A Blog Named Hero’s 12th anniversary, the theme is Happy Anniversary/Birthday.
*please note: affiliate links were used when possible in this post at no extra cost to you… thank you*
HA products used:
▪️Pitch Black cardstock
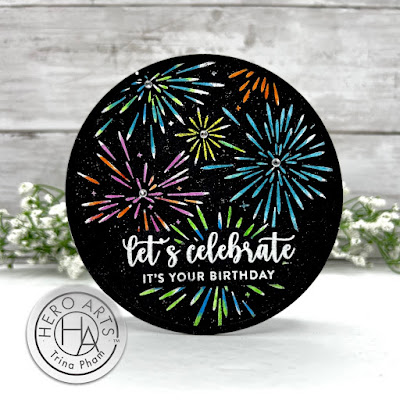
While I had the Sparkling Fireworks background stamp out from creating my reminder card last month, I decided to use it for a colourful circle shaped birthday card.
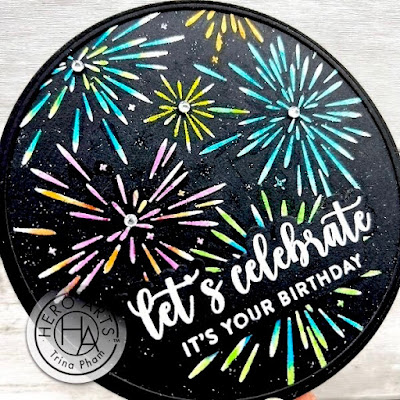
A circle and circle frame were die cut from pitch black cardstock using circle infinity dies. With the fireworks stamp facing up, inked it with VersaMark ink then pressed the circle cutout onto it. Added white embossing powder, and before heat setting it, removed the powders from some of the images with a small brush. It would have been too busy otherwise. 😉
Next, using various Copic Sketch markers, coloured the embossed fireworks images. FYI, it did not ruin my markers. 👍 White heat embossed the sentiments onto pitch black cardstock as well, then fussy cut out. Partial die cut a circle card base then assembled the card. Embellished with clear jewels on the fireworks centers to finish.
Are you ready to play along? Any brand products are welcomed, but to qualify for one of two HA $50 gift cards to their online shop, must use at least one HA brand product. One winner will be chosen randomly and the other will be voted on by the DT. For full details, more inspirations and/or to link up your entry by 5:00 pm PT on May 5th, 2024, please click HERE. Thank you for stopping by.
Challenges:
April 01, 2024
Mix and Match Marquee
Hello there. April 1st already!? No April Fools joke… Whimsy Stamps (WS) has released a couple of new products today. They added to their Quick Card Fronts (QCF) collection with the newest super adorable Bee Cute pack and a new Mix and March Marquee die set. I’m featuring the die set in a spring-themed bunny tunnel card.
The Bunnies in the Garden images were stamped with Memento Tuxedo Black ink on X-Press It paper while the rainbow from Array of Rainbows die set was die cut from the same paper. Both were coloured with Copic Sketch markers. The stamp set also has coordinating masks and dies, but I don’t have the dies so the bunnies were fussy cut out.
Copic markers used:
reds - R14/27/46/39
yellows - Y32/35/38
greens - YG03/06/09, G09
blues - B02/04/06
purples - V04/15/17
planter pot - E02/08/09/29
jumper - G000, BG11/34
white bunny fur - W00/1/3
For some sparkle, added clear shimmer to the rainbow. The three marquee layers were die cut from A2 size panels of Bristol paper and light blue cardstock. Ink blended blue dye ink directly onto the whit card base for the sky background before assembling the card to finish. Dimension between the layers was achieved with foam adhesive.
That’s it for my card. Thank you for stopping by.
*affiliate links used in this post at no extra cost to you… thank you!
Challenges:
Subscribe to:
Posts (Atom)


